IMPORTANT NOTICE TO CONSUMERS
This product has been manufactured according to strict specifications
and voltage requirements that are applicable in the country in which it
is intended that this product should be used. If you have purchased this
product via the internet, through mail order, and/or via a telephone
sale, you must verify that this product is intended to be used in the
country in which you reside.
WARNING: Use of this product in any country other than that for
which it is intended could be dangerous and could invalidate the
manufacturer’s or distributor’s warranty.
Please also retain your receipt as proof of purchase otherwise your product
may be disqualified from the manufacturer’s or distributor’s warranty.
Introduction
Installing the batteries
Slide and remove the battery compartment
cover located on the back of the GA-40.
Insert the batteries ensuring that you
observe the correct polarity, and replace
the cover.
If the GA-40 malfunctions, and you are unable to solve the
problem by turning the power off and on again, try removing
the batteries and then reinstall them.
The included batteries are provided for the purpose of verifying
operation and therefore may have a shorter lifetime than usual.
When the batteries run low, a battery
indicator will appear in the left of the
display. When this indicator appears, replace
the batteries as soon as possible. Power-off
the GA-40 before you replace the batteries.
Using the stand
By opening the stand located on the back,
you can position the GA-40 at a conve-
nient angle.
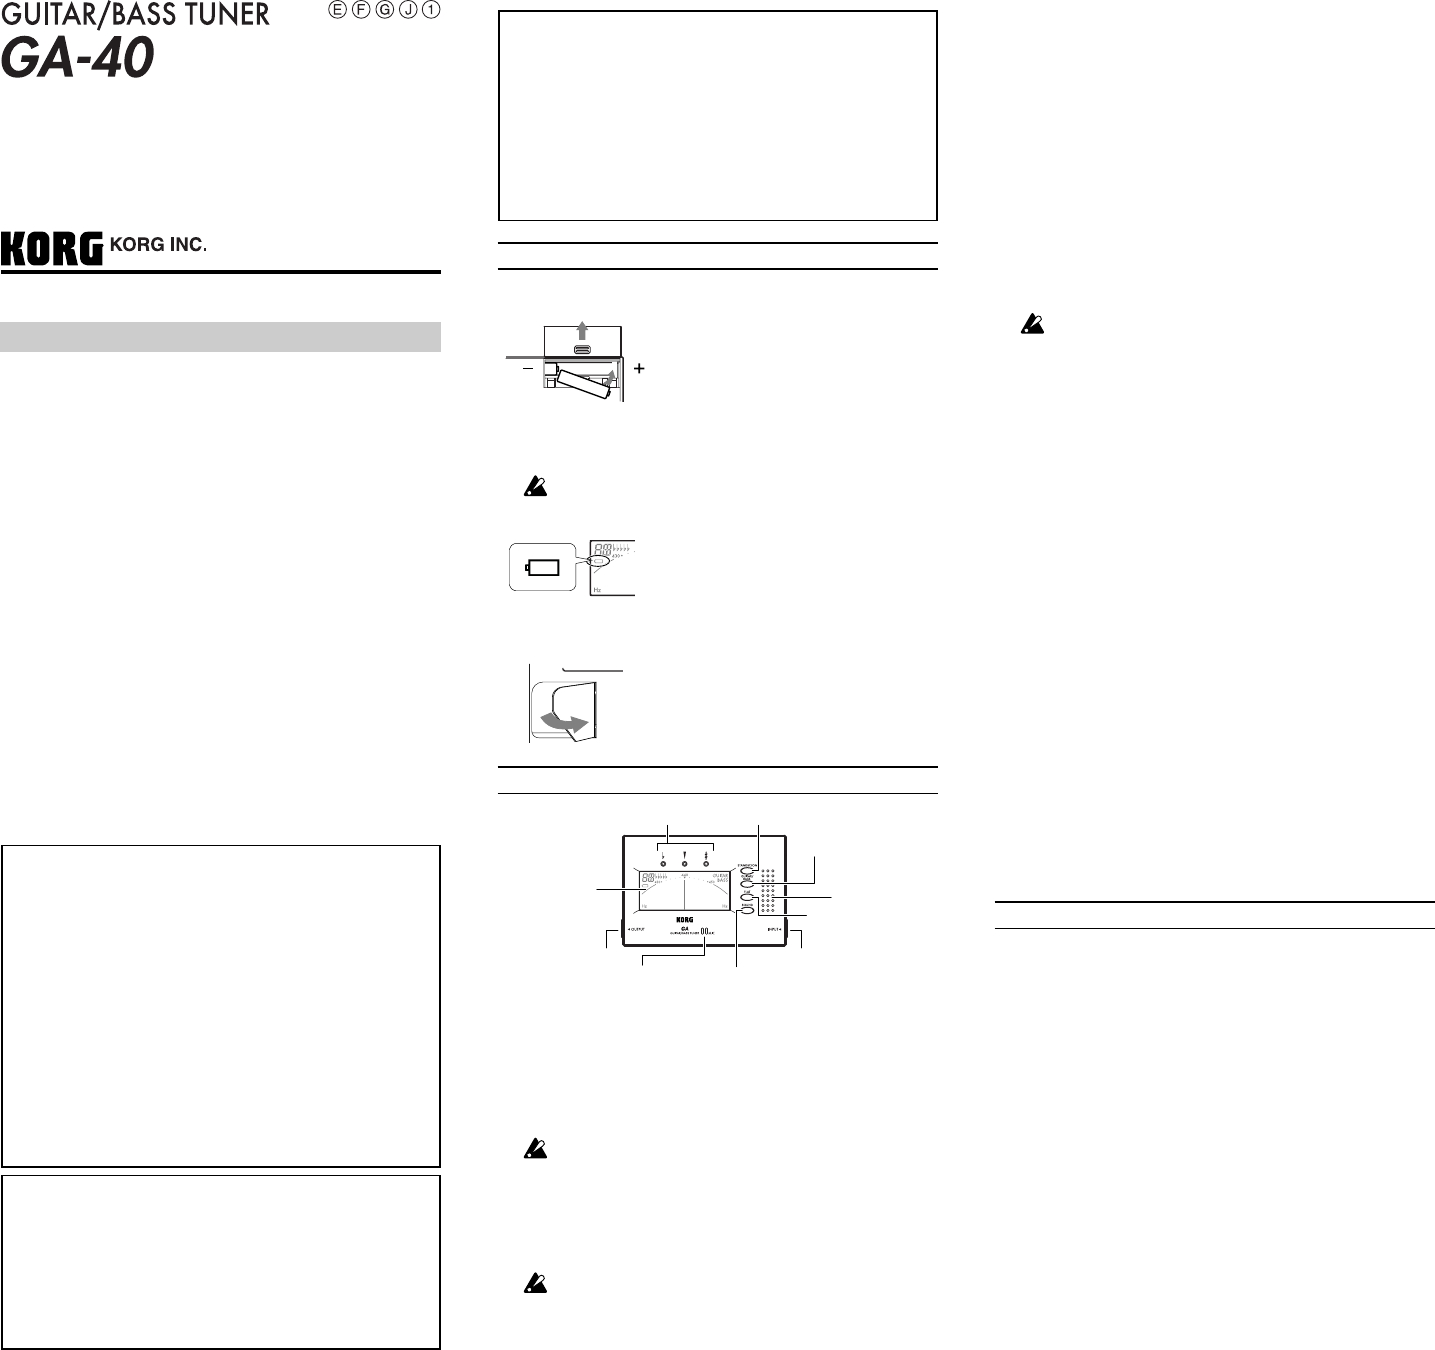
Using the tuner
[STANDBY/ON] button
[GUITAR/BASS] button
[FLAT] button
Display
INPUT jack
Tuning guide
Internal mic [SOUND] button
Speaker
OUTPUT jack
Meter mode
This mode lets you tune using the meter in the display.
1 Connect the tuner. The connection method will depend on the type
of guitar you're using.
When tuning an electric guitar or bass
Be sure to use an instrument cable for connection to the GA-40's
INPUT jack.
You can't use the internal mic if a plug is inserted in the INPUT jack.
If you're performing on stage, it is convenient to use the GA-40's
OUTPUT jack. Connect your guitar to the GA-40's INPUT jack,
and then connect your amp to the OUTPUT jack. The sound of
your instrument will be sent from the GA-40's OUTPUT jack to
your amp, allowing you to tune or perform while the GA-40
remains connected.
If you've connected the OUTPUT jack to your amp etc., you
must insert a cable into the INPUT jack. If nothing is con-
nected to the INPUT jack, the internal mic will be automati-
cally used. In this case, sound entering the internal mic could
cause feedback, possibly damaging your amp.
Precautions
Location
Using the unit in the following locations can result in a malfunction.
• In direct sunlight
• Locations of extreme temperature or humidity
• Excessively dusty or dirty locations
• Locations of excessive vibration
• Close to magnetic fields
Power supply
Be sure to turn the power switch to OFF when the unit is not in use.
Remove the battery in order to prevent it from leaking when the unit is not
in use for extended periods.
Interference with other electrical devices
Radios and televisions placed nearby may experience reception interfer-
ence. Operate this unit at a suitable distance from radios and televisions.
Handling
To avoid breakage, do not apply excessive force to the switches or controls.
Care
If the exterior becomes dirty, wipe it with a clean, dry cloth. Do not use
liquid cleaners such as benzene or thinner, or cleaning compounds or
flammable polishes.
Keep this manual
After reading this manual, please keep it for later reference.
Keeping foreign matter out of your equipment
Never set any container with liquid in it near this equipment. If liquid gets
into the equipment, it could cause a breakdown, fire, or electrical shock. Be
careful not to let metal objects get into the equipment.
THE FCC REGULATION WARNING (for U.S.A.)
This equipment has been tested and found to comply with the limits for a
Class B digital device, pursuant to Part 15 of the FCC Rules. These limits
are designed to provide reasonable protection against harmful interference
in a residential installation. This equipment generates, uses, and can
radiate radio frequency energy and, if not installed and used in accordance
with the instructions, may cause harmful interference to radio communi-
cations. However, there is no guarantee that interference will not occur in
a particular installation. If this equipment does cause harmful interference
to radio or television reception, which can be determined by turning the
equipment off and on, the user is encouraged to try to correct the
interference by one or more of the following measures:
• Reorient or relocate the receiving antenna.
• Increase the separation between the equipment and receiver.
• Connect the equipment into an outlet on a circuit different from
that to which the receiver is connected.
• Consult the dealer or an experienced radio/TV technician for help.
Unauthorized changes or modification to this system can void the user’s
authority to operate this equipment.
CE mark for European Harmonized Standards
CE mark which is attached to our company’s products of AC mains
operated apparatus until December 31, 1996 means it conforms to EMC
Directive (89/336/EEC) and CE mark Directive (93/68/EEC).
And, CE mark which is attached after January 1, 1997 means it conforms
to EMC Directive (89/336/EEC), CE mark Directive (93/68/EEC) and
Low Voltage Directive (73/23/EEC).
Also, CE mark which is attached to our company’s products of Battery
operated apparatus means it conforms to EMC Directive (89/336/EEC)
and CE mark Directive (93/68/EEC).
When tuning an acoustic guitar
If you're using a separately sold Korg CM-100 contact mic,
connect the CM-100's plug to the GA-40's INPUT jack.
If you're using the internal mic, don't connect anything.
2 Press the [STANDBY/ON] button.
The GA-40 will be in Meter mode.
The power will turn off automatically if the tuner is not used for
approximately twenty minutes.
3 Press the [GUITAR/BASS] button to select the instrument you're
tuning. The tuning pitches will be as follows.
GUITAR: 7B, 6E, 5A, 4D, 3G, 2B, 1E
BASS: LB (Low B), 4E, 3A, 2D, 1G, HC (High C)
4 Play a single note on your instrument.
The name of the note closest to the note you played will appear
in the upper left of the display. Tune your instrument so that the
desired note name appears.
If you're using the internal mic, position the mic as close as
possible to your instrument, and ensure that extraneous back-
ground sounds are not picked up by the mic while tuning.
5 While playing a single note, tune your instrument so that the indi-
cator in the center of the tuning guide is lit (if the tuning reference
is A=440 Hz).
The left indicator of the tuning guide will light if the pitch of
your instrument is too low, and the right indicator will light if the
pitch is too high. Each step in the meter is approximately 2 Hz.
Sound Out mode
This mode lets you listen to a reference tone while you tune.
1 Perform steps 2 and 3 of “Meter mode.”
2 Press the [SOUND] button.
The GA-40 will be in Sound Out mode, and the speaker will play
a reference tone.
3 Press the [SOUND] button again to select the desired note name.
The reference tone is one octave higher than the actual pitch of your
guitar, and two octaves higher than the actual pitch of your bass.
4 Tune your instrument to match the reference tone.
Flat tunings
In either Meter mode or Sound Out mode, you can tune to a pitch that
is between one semitone (
) and five semitones ( ) below the
selected note name.
This setting will not be remembered when you turn off the power.
1 Press the [FLAT] button several times to specify how far you want
to lower the pitch relative to the note name.
2 Tune your instrument in the usual way using Meter mode or Sound
Out mode.
Specifications
Scale: 12-note equal temperament
Detection range: Guitar...B1
(46.249 Hz) – B6 (1975.54Hz)
Bass...B0
(23.12 Hz) – B5 (987.77 Hz)
Reference tone: Guitar...7B, 6E, 5A, 4D, 3G, 2B, 1E
Bass...LB (Low B), 4E, 3A, 2D, 1G, HC (High C)
Tuning modes: Meter mode (AUTO), Sound Out mode (MANUAL)
Flat tuning:
Semitone steps of 1 semitone (
) 5 semitones (
)
Detection accuracy:
±1 cents or better
Tone accuracy: ±1.5 cents or better
Connectors: INPUT jack (1/4” mono phone jack)
OUTPUT jack (1/4” mono phone jack)
Speaker: Dynamic speaker (28 mm diameter)
Power supply: Two AAA batteries (3V)
Battery life: Approximately 85 hours (Meter mode, continuous
A4 input, zinc-carbon batteries)
Dimensions: 100 mm (W) x 67mm (D) x 17mm (H)
3.94” (W) x 2.64” (D) x 0.67” (H)
Weight: 69g (without batteries), 88g (with batteries)
2.43oz. (without batteries), 3.10oz. (with batteries)
Included items:
Owner's manual, two AAA batteries for verifying
operation
*Specifications and appearance are subject to change without notice for
improvement of the product.
Owner’s Manual
Thank you for purchasing the Korg GA-40 guitar/bass tuner.
2005 KORG INC.
4015-2 Yanokuchi, Inagi-city, Tokyo 206-0812 Japan
 Manymanuals.com
 Manymanuals.de
 Manymanuals.fr
 Manymanuals.it
 Manymanuals.pl
 Manymanuals.cz
 Manymanuals.es
 Manymanuals-pt.com
Comments to this Manuals